Katja Kromann Portfolio
Web / Branding
Is your website dressed for Christmas?
An easy way to dress up your website for Christmas is to change out your logo or banner with a holiday banner or logo. Here and here are two that I made. (You will only be able to see this until January 2013). Here are the banners/logos with and without Christmas styling.

This one is a bit more subtle, with just a snowman peeking out between the cards.

This one is more bold. Just be sure to keep some of the same design elements, so the brand is still easily recognizable. Here I kept the owl, the same white logo and the top and bottom horizontal lines.
For the gold lettering, I used this tutorial, but then changed the settings to my own colors, to give the gold a bit more patina. I added a hint of the "bubbles" pattern overlay in the effects panel as well. You can play around with your own settings.
You can also change every color in the effects panel to the corresponding gray and get silver text.
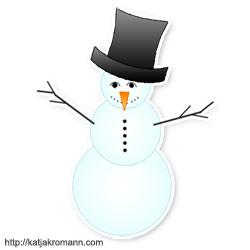
For the snowman, I did a quick search for some clip-art, but did not like the options I found, so I made my own.
Like with the camera icon I used simple shapes.
Here you can see the types of shapes I added and subtracted to make the rim of the hat.

For the hat cylinder, I used "warp" on a rectangle. To get to the warp tool, you hover the mouse around the transform controls (corners of the shape) and click once. Then you get a warp tool on the top of the screen:

The tool creates a 9 square grid over the selected shape (my hat was straight while I did this, so not exactly like the picture). Then you can drag and warp the image.
This time I used radial gradients for most of the shapes instead of linear. This works really well for circular shapes that you want to give some dimension.
For the three body circles I used these settings.

Click image to view larger.
For the hat and rim (On two separate layers) the gradient went from #000000 on the left to #d9d9d9 on the right, with a 1px stroke of #000000 (black)
The nose was #f7d073 on the left and #ff7c00 with a 1px stroke of #e87607.
The arms were made with a brush, hardness 100% and holding down Shift to make the lines straight. With each stick on its own layer you can mix the angles of the branches.
Then after the snowman was created, I made a copy of all the layers and merged them (CTRL E). Then added a 5px #ffffff (white) stroke and a drop shadow. (Distance 5px, spread 0%, size 12px, Angle 134 degrees).
That's it.

We also added a snow effect to both sites.
Does that not scream: Happy holidays!
This one is a bit more subtle, with just a snowman peeking out between the cards.
This one is more bold. Just be sure to keep some of the same design elements, so the brand is still easily recognizable. Here I kept the owl, the same white logo and the top and bottom horizontal lines.
For the gold lettering, I used this tutorial, but then changed the settings to my own colors, to give the gold a bit more patina. I added a hint of the "bubbles" pattern overlay in the effects panel as well. You can play around with your own settings.
You can also change every color in the effects panel to the corresponding gray and get silver text.
For the snowman, I did a quick search for some clip-art, but did not like the options I found, so I made my own.
Like with the camera icon I used simple shapes.
Here you can see the types of shapes I added and subtracted to make the rim of the hat.
For the hat cylinder, I used "warp" on a rectangle. To get to the warp tool, you hover the mouse around the transform controls (corners of the shape) and click once. Then you get a warp tool on the top of the screen:
The tool creates a 9 square grid over the selected shape (my hat was straight while I did this, so not exactly like the picture). Then you can drag and warp the image.
This time I used radial gradients for most of the shapes instead of linear. This works really well for circular shapes that you want to give some dimension.
For the three body circles I used these settings.
Click image to view larger.
For the hat and rim (On two separate layers) the gradient went from #000000 on the left to #d9d9d9 on the right, with a 1px stroke of #000000 (black)
The nose was #f7d073 on the left and #ff7c00 with a 1px stroke of #e87607.
The arms were made with a brush, hardness 100% and holding down Shift to make the lines straight. With each stick on its own layer you can mix the angles of the branches.
Then after the snowman was created, I made a copy of all the layers and merged them (CTRL E). Then added a 5px #ffffff (white) stroke and a drop shadow. (Distance 5px, spread 0%, size 12px, Angle 134 degrees).
That's it.
We also added a snow effect to both sites.
Does that not scream: Happy holidays!
This article: Is your website dressed for Christmas? first appeared on katjakromann.com